New in Java 18: Code snippets in Javadoc (part 1)
Write better Javadoc using code snippets (part 1)
As Java developers, our job is not only to write working code but also to document it properly. Since its beginnings, Java has provided us with the javadoc tool, which generates this output from the specially formatted documentation comments we wrote in the source code. In these documentation comments, we use various tags to document parameters, return values, exceptions thrown, etc. It is often the case that we must include a code snippet to show intended usage of our code. Until Java 18, we relied on the @code tag, perhaps in combination with <pre>…</pre> if we needed multi-line snippets. But now we have a better way, and that is by using the new @snippet tag. Let’s see its basic usage in action!
Inline @snippet tag
The simplest usage is to use an inline @snippet tag and to include some code between a colon (:) and a closing curly brace, like this:
/**
 * Demo of non-escaping for special characters within @snippet tag.
 *
 * {@snippet :
 * int myvar = 42;
 * <html></html>
 * & also works;
 * @ also works;
 * }
 */
public void demoSpecialCharacters() {
}
Generated JavaDoc will look like this:
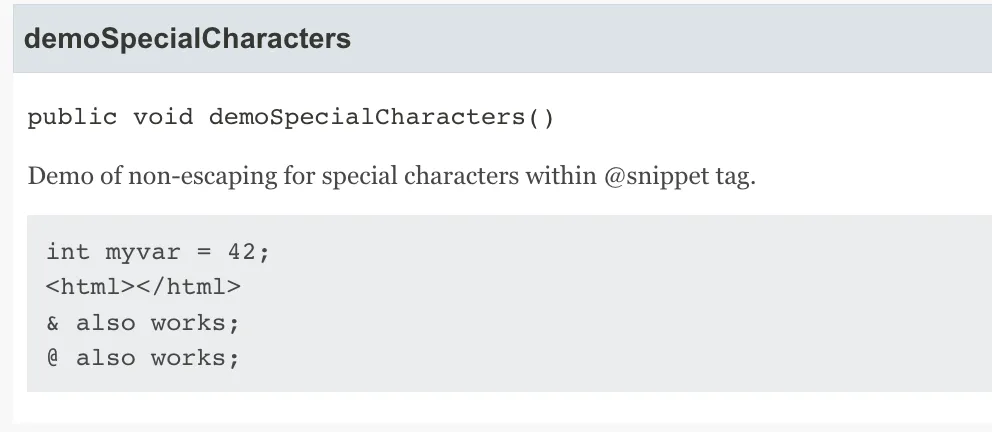
We can immediately notice a few improvements over the <pre>{@code …}</pre> combo:
- easier to type with less clutter in source file
- no need to escape special characters such as
<,>,&… - there is a grey background which makes snippets more visible
- there is a Copy button which copies snippet to the clipboard as-is in plain text
Linking
There are several ways we can instruct the javadoc tool to present the text in more detail. One of them is by linking a text fragment to some other place in the documentation, be it internal (i.e., to some other documentation comment on the same page) or external (i.e., to a documentation comment of some other class or even to a JDK class). We use linking by including the @link markup tag somewhere between the contents of a @snippet:
/**
 * Demo of linking within @snippet tag.
 *
 * {@snippet :
 * System.out.println("link to System.out"); // @link substring="System.out" target="System#out"
 * final Main app = new Main();
 * // @link substring="demoHighlight()" target="#demoHighlight":
 * app.demoHighlight();
 * }
 */
Generated JavaDoc will look like this:
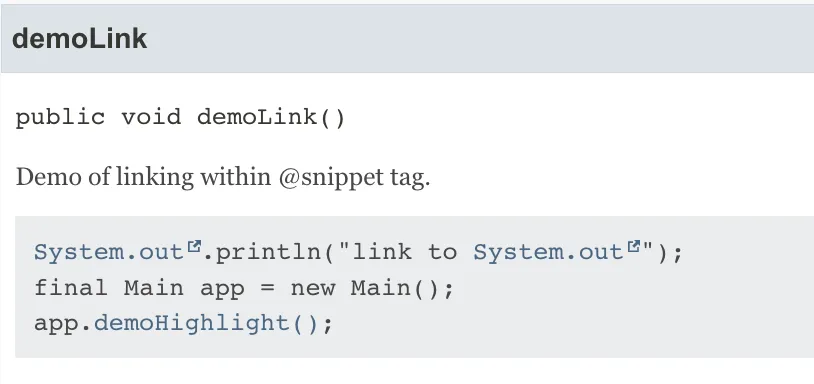
In the first line, we link to the famous out member of the java.lang.System class. You probably noticed the icon right next to the System.out, which tells us it’s an external link. In contrast, there’s no icon next to the demoHighlight(), which tells us it’s an internal link. As with most links on the web, these also change color on mouse hover, which is another visual cue to the user that that part is clickable.
Highlighting
Another very nice usage of markup tags is to highlight some part of the snippet. We can highlight entire lines or just specific words. We’re also able to make the text bold, italic, or with highlighted background to properly show to the reader which parts of a snippet deserve special attention. All of that is controlled by the @highlight markup tag within a @snippet tag:
/**
 * Demo of highlighting within @snippet tag.
 *
 * {@snippet id="snip1" :
 *         Point p1 = new Point(2, 30); //@highlight
 *         //@highlight substring=System.out type=italic region=output:
 *         System.out.println(p1); //@highlight substring="p1" type="italic"
 *         System.out.println(p1.x()); //@highlight substring=p1:
 *         System.out.println(p1.y()); //@highlight substring="out" type="highlighted"
 *         System.out.println(p1.y()); //@highlight substring="y()" type="highlighted"
 *         //@end region=output
 * }
 */
Generated JavaDoc will look like this:
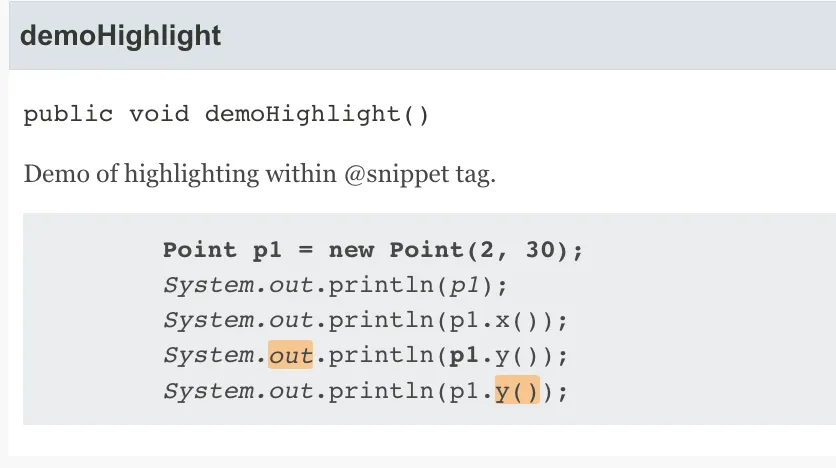
Let’s connect what we see in the code to the resulting JavaDoc.
The simplest usage is Point p1 = new Point(2, 30); //@highlight. It will make the entire line bold, which is the default highlighting type.
Slightly more complex is making just one word (substring, actually) italic: System.out.println(p1); //@highlight substring="p1" type="italic". Here we had to specify which substring we want to highlight and which type of highlighting we want to use.
The previous two examples were about highlighting something in the same line. But we can also control highlighting for the next line in the snippet like this: System.out.println(p1.x()); //@highlight substring=p1 :. Note the : at the end of the line — that means that highlighting is applied to the next line in the snippet so that p1 (in the p1.y() part) will become bold. Space before the : isn’t mandatory, but I find it more readable this way. I feel this might become a source of confusion because some developers will prefer highlight to affect the current line whilst others will prefer it to affect the next line. As in all similar cases, I would vote for consistency throughout the code base.
If we want to add background color, we must use type="highlighted" like this: System.out.println(p1.y()); //@highlight substring="out" type="highlighted". Now out will have an orange background. But you might’ve noticed it’s also written in italic. How come?
The answer is in the //@highlight substring=System.out type=italic region=output : a few lines above. This line defines a named region and applies a highlight of type italic to all matching substrings in this region, in this case System.out. Since they are all italic, the previous line just added a background to the out. This shows how highlights can be combined. By the way, all named regions must be closed with the @end markup tag: //@end region=output.
Official JEP specification
I’ll cover more advanced usages of the @snippet tag in part 2. If you want to dive deeply into the specification of this feature, you may find it in JEP 413.
Dear fellow developer, thank you for reading this article about inline code snippets in Javadoc. Until next time, TheJavaGuy salutes you 👋!